

APPENDIX 4:
Load Order & How to Troubleshoot Errors Properly
ETS2 - Colección de Mods "La Ruta de los Lobos"
Load Order (LO), what is and how to manage it in ETS2
Games that allow mods to modify the gaming experience, have many things in common, one being the ability to setup a specific load order for the mods at the time the game is loading.
Some games has its own Mod Manager to place mods in a specific position in the Load Order (from now on we mention it as LO), ETS2 is one of those, others need a third app in order to achieve same feature, like Skyrim, and some are in the middle of both cases, like No Man’s Sky.
Coming back to ETS2, the game has an imbued Mod Manager that allows us to setup Mods visually with ease. We just need to install mods in one of two ways: using Steam Workshop and subscribing to mods we want to use, or downloading them manually from other sources, like TruckyMods, ModLand, Promods, authors’s websites and others and placing them in the Documents/Euro Truck Simulator 2/mod folder.
That is the easy part: to get mods. But then we need to keep them updated and compatible with the last version of the game, to avoid crashes and errors. We need to constantly and actively watch over our mods list to avoid issues.
But then is a third, and very important task for us: to place them in a order that allows the game use them without conflicts with each other and with the game itself. That is because the game engine, when loading, will check if mods are installed, and depending in which position is placed in the Mod Manager Active List, it will affect other mods in the LO.
Let see a general screenshot of the Mod Manager in-game:
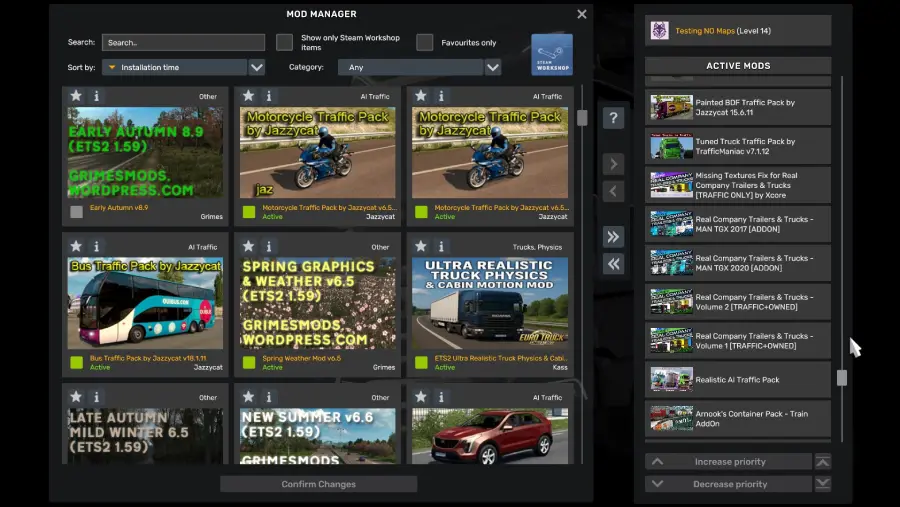
In the screenshot above you can see the mods were recognized when the game opened. These mods are shown at the left side, but they are unusable if we do not add them to the Active Mods list to the right. Only when we active them, the game will use them when we load any save file.
Now, each Career profile has its own LO completely isolated from other Career LOs. In other words: all Careers profiles will see the same mods list to the left, but only will show in the Active Mods list those mods we intentionally added in that specific Career profile.
This is crucial to understand: we can have different profiles with different mods active at any time, and switch to another profile without losing its specific LO.
But how exactly works the LO?:
We know the Mod Manager will load only the mods placed in the Active Mods list. But how it works exactly?.
Is really simple: the game engine will start reading mods from bottom to top of the list, that is.
So, if we have two mods that change same values in-game, it will win the one that is higher in the LO, in detrimental of the other one.
But why we would use two mods that change same values?. Well, some mods affect many parts of the game, for example: weather mods affect flora textures, sky textures, rain textures and more. But we have another mod that we prefer for the rain textures. So we can use both, placing the weather mod lower in the LO and the rain mod higher so the weather mod will apply all its modifications to the game, but specifically the rain will be “win” by the rain textures since will loaded after the Weather mod. It is as simple as that.
Lets see a graphic example of that:
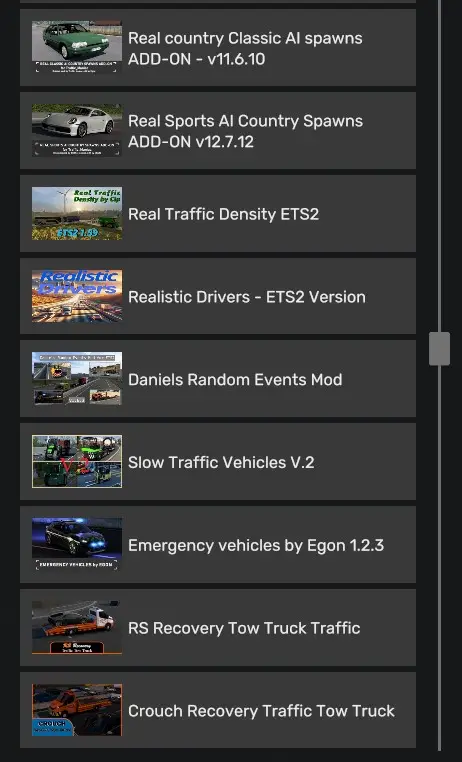
In the screenshot above, you can see the Real Traffic Density Mod, which has to be higher than any AI Traffic Mod in the LO priority. But, there are in the image two exceptions: Real Country Classic AI Spawns Add-on and Real Sport AI Country Add-on, both which modify the spawn ratio of two mods that way down the LO, not visible in the image: Classic Cars Traffic Pack by TrafficManiac and Sport Cars Traffic Pack by TrafficManiac.
So, we have the two Classic and Sport mods adding traffic to the spawn pool at any giving time, them we have higher in the LO the Real Traffic Density mod dictating the general spawn numbers that affect all mods below, and then the two add-ons higher that ensure the original Classic and Sport mods spawn specific cars according to the country the player is on when playing. This is the order these 5 mods has to be in the LO so they all work together nicely.
Lets see now the two previous mentioned original mods Classic and Sport placed in the LO much lower than the Density and Real AI by Country:
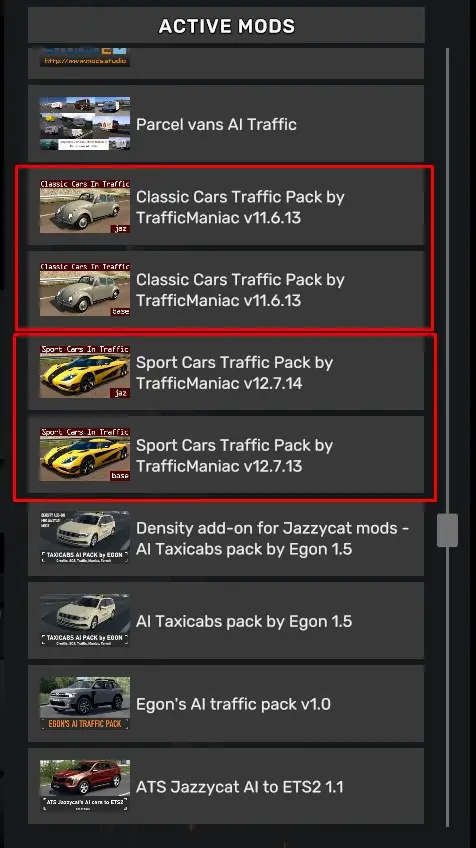
As you can see in the image, each mod consist in two different files:
The definition file and the base file. The def dictate spawn ratios and the base file has the cars models. It has to be first (lower) the base, and then over (higher) the definition. That is the only correct LO to make this two single mods that composed of two files, works.
In summary, the classic and the sport mods consist in two files each, being the base part lower and the def part higher, then we have the Density Traffic placed above all 4 files in the LO, dictating the final spawn ratios for each one, and then even higher, we have the two extra plugins on top of Density dictating in which country spawn what model of classic and sport cars from the original mods down below.
That is how it works LO. Is as important as maintain mods updated and not using mods that modify same values in-game at least is intentional and strictly necessary, like the case above.
An example of unnecessary use of two mods that replace exactly the same values in ETS2, is Better Flares by Avelium, that we use in our guide, and Realistic Vehicle Lights Mod by Frkn64, on Steam Workshop. if you install both, will win the one activated and placed higher, making the other one useless and pointless to have it even installed at least we are testing and deciding between both. In many cases, having two mods with similar changes active can lead to issues and errors.
Having said the above, is important to clarify that the guide prefer one mod over another not because the dismissed is a bad mod, but because we think that the chosen one reflects better our vision for the guide. There are other factors also at the moment we chose one mod over another, like updating frequency, compatibility with the last version of the game and active presence of the mod author in the mod’s page. This last point, though, we see with nuance, since Mod Authors has their own life and they are in no ways obligated to provide support for their mods. Is up to us, as users, to chose between or move one when a mods is abandoned.
Ok, cool, but how do I detect and troubleshoot properly?:
Now we will learn how to identify, isolate and try to solve to the best of our abilities the cause of errors in game.
Errors can have different consequences, like crashing to desktop (the game close itself and get us back into the operative system desktop). Can also trigger lack of textures, which means pink textures in buildings or vehicles. Or even worst: lack of textures and collision, like suddenly while you are driving your truck, the road disappears entirely.
Some errors are minor and some are important to address. Some are fixable and some are not, so is up to us deciding if we keep using the mod that triggers the error.
The reasons why mods or the game trigger errors can be, and also use this same list to check that everything is correct:
- The game is outdated.
- Mod is incompatible with the last version of the game.
- Mod is incompatible with another mod.
- Mod is placed in the wrong priority at the LO in the in-game mod manager active mods.
- In a few cases, the errors will be caused by the game itself, even when updated, and in those cases, the solution can only come from SCS.
.
IMPORTANT: always check two or three times all the mods you are using are for the version of the game, that you did not skipped or misplaced any mod in the LO. 99% of the times a error occurs, is because we missed something.
Enabling the console to show in-game:
In order to work with more precision while detecting errors, we need to enable two settings in the file config.cfg located at x:\Documents\Euro Truck Simulator 2. Do not confuse this file with the one with the same name inside each profile we have created previously.
Open the config.cfg with Notepad++ and use the Search feature at the top Menu and write down first “developer” in the Find what box, change the value for uset g_developer “0” to uset g_developer “1”. Then search again for “console” and change the value from uset g_console “0” to uset g_console “1”. Save the changes and close the file.
In doing that, now you can see the console in-game and have a better view of errors triggering while you play.
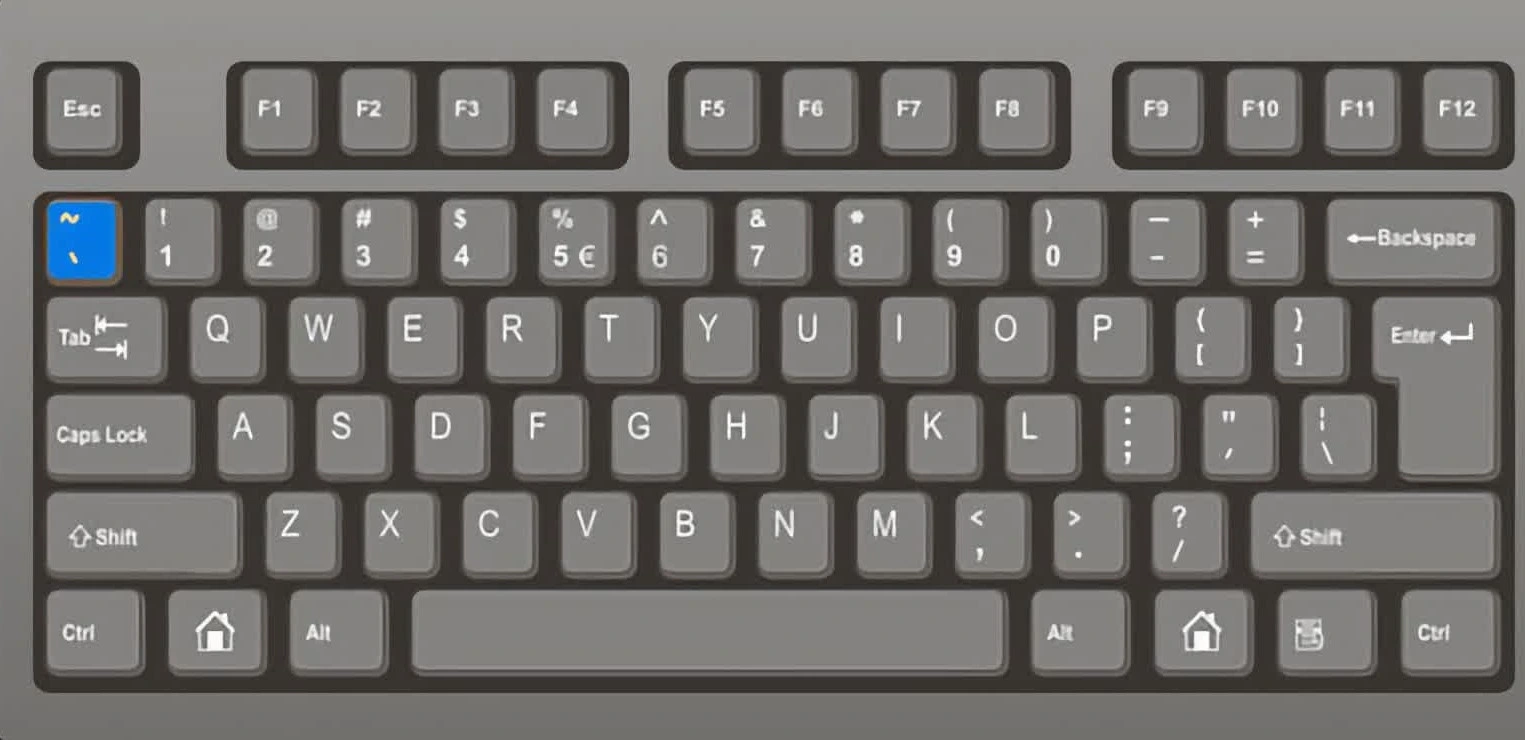
To access the console, you need to press the tilde key in your keyboard, located in the left side of it. See screenshot:
Before continuing, take this opportunity to familiarize yourself with two files located in the same folder, x:\Documents\Euro Truck Simulator 2:
game.crash.txt y game.log.txt.
These two files contain the info related to crashes the first and the game session the second, where you can see errors and warnings. When you open the console in-game, you will see the last notifications in the console, but the game.log.txt is the full session of it. Is an important tool to troubleshoot that sometimes you will have to upload when required by mod authors, official SCS support and collection guides support, like GMC Community Map Combos and our own Collection, Route of the Wolves.
Now lets take a look at the console inside the game:
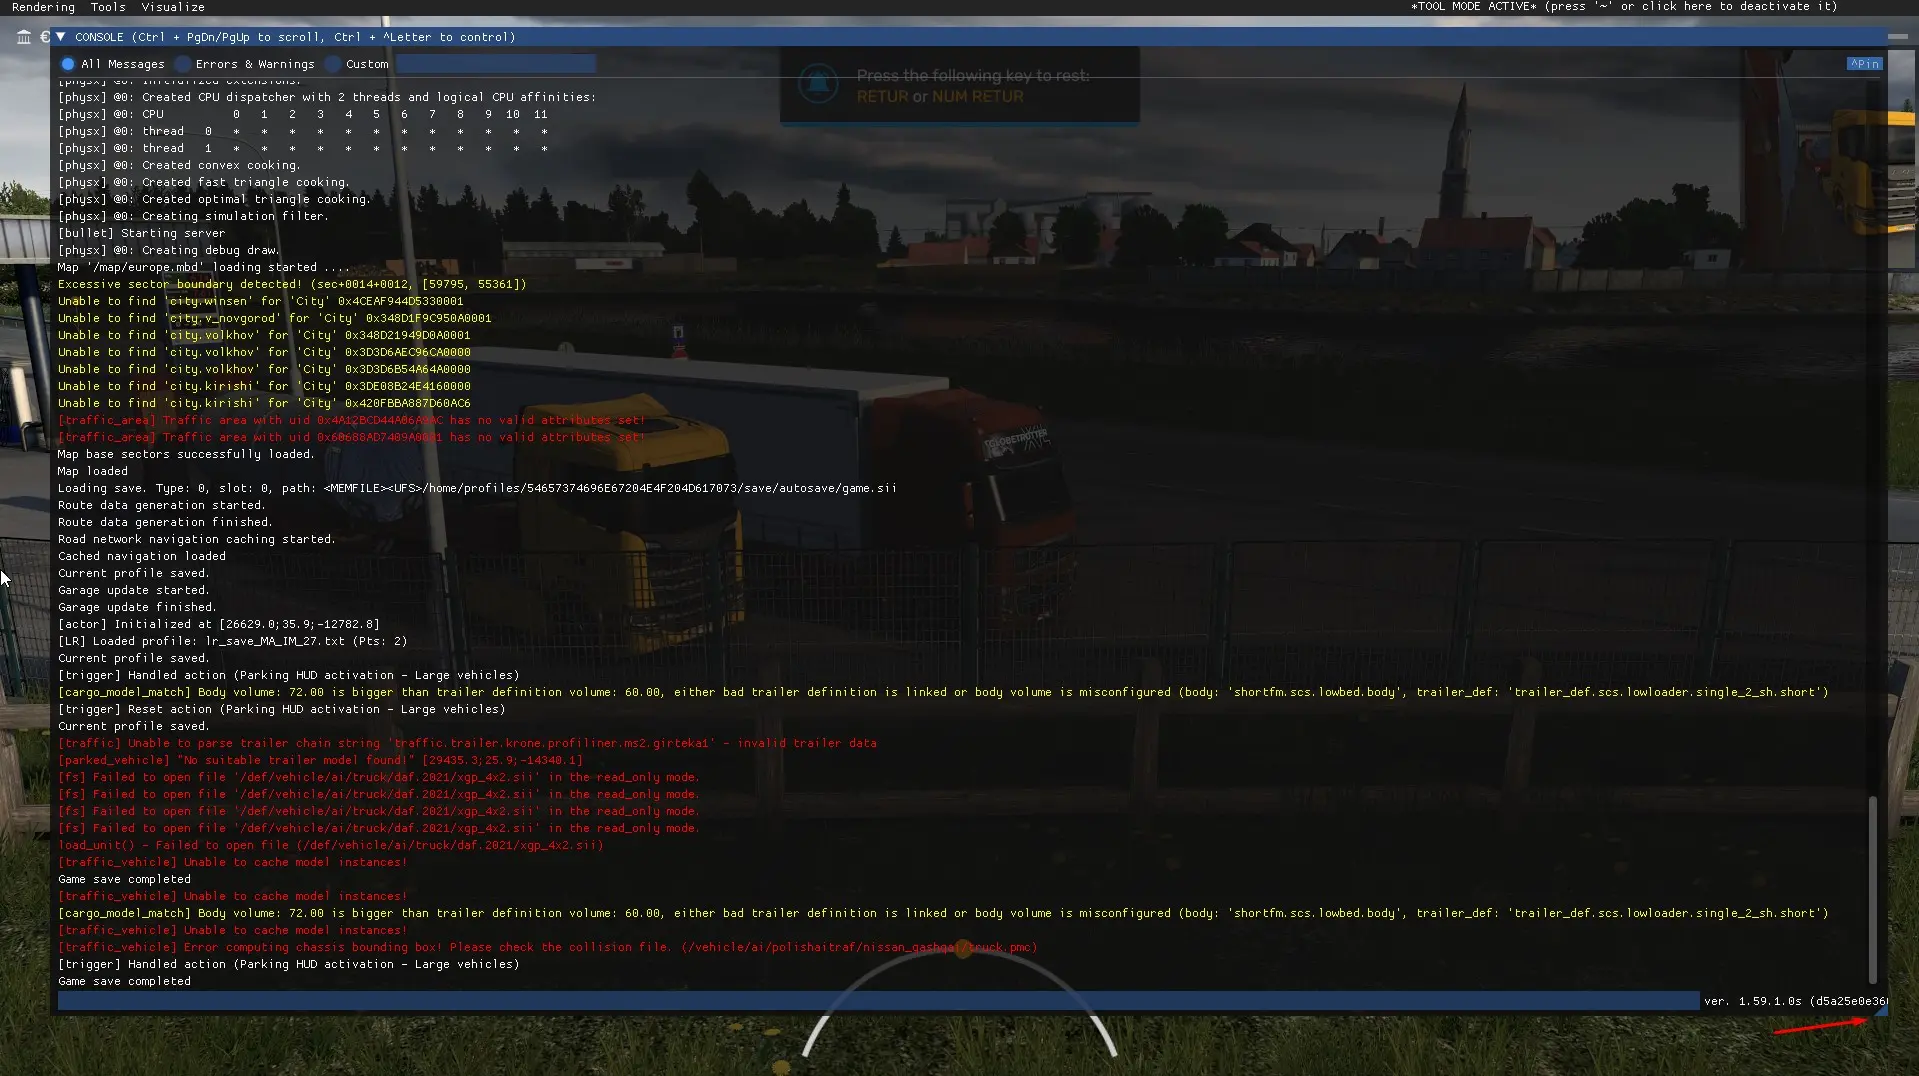
Above you can see a section of the console, where the text in white are regular notifications that are informative, then you find information about minor issues in yellow and then notifications in red, this are the ones we need to focus.
Be advice that not all red warnings are game breaking, some are only internal errors on one or more mods, and as a consequence, the mod will work partially but it will affect the gameplay.
Is only when you see real issues while playing, like lose of performance, pink textures (more correctly is lack of textures), collisions problems, etc. that you need to open the console and take note about what was the problem, and from there you can try to isolate it.
This is where the Career profiles we advice you to create in the Appendix 3 come into use. Depending on the type of issue, you can try replicating it using the Takoda ONLY or the GMC Map ONLY, so you will know from which collection comes the error. Another strategy is to use the Vanilla profile with only the mods you suspect are triggering the error or issue. Now, remember that both are collections, and the vast majority of the mods comes from third party authors.
In order to use any profile you are not regularly playing with, we recommend you install a mod that allows you to start the game with a significant amount of money so you can buy a truck as soon as possible and be able to drive freely.
The mod in questions is:
ETS2 XP & Economy Rebalance
Category: Economy, Difficulty
The ETS2 XP & Economy Rebalance is a mod designed to enhance the progression and economic aspects of Euro Truck Simulator 2 (ETS2). It offers a more relaxed and rewarding experience, ideal for players who prefer a less grind-intensive gameplay.
- 💰 Starting Bonus: Receive €250,000 when creating a new profile (one-time reward).
- 🕒 “Unlimited” Delivery Time: No more tight schedules—deliver at your own pace.
- 🚛 Massive XP Boost for Parking: Parking the trailer can skyrocket your level (e.g., Level 0 → Level 42).
- And much more features…

Special Instructions and Notes:
You can use this mod to accelerate your progress in the careers that you are using to test issues only, so you can get money to buy a truck and level up fast. This mod make the game much more easier from the go.
Of course, you can also use it in your main profile instead of the economy mod our collection recommend that makes the game more difficult and realistic, is up to you really, but remember to deactivate any mod along related to economy, like Remover Ferries by Quper.
What we want, as users, is to be as precise as possible, instead of just sending a message to the any mod author or collection support with vague information. That is why is important to test with the profiles trying to replicate the issue.
Remember: mod authors and mod collection guides are voluntary work, and even if you have donated any amount of money, the people do it out of love for the game and the community, and they still have private life. So, be polite, precise and helpful.
Once you have identified the mod you suspect is causing the issue, try one last time to replicate the issues with only that mod active in the Vanilla profile.
Try to not disable mods blindly in your main profile, where you are playing the game. Only when you are certain from where comes the issue, disable it. Be patient. Read the game.log.txt. and have it ready to upload if is requested by the authors or collection support.
There is also a list of bugs here at our guide where you can try to search for the same issue: Know Bugs. Is a list that is always being added new bugs, so you can start there.
One last advice: in my more than 15 years modding games, I have came to the conclusion that 99% of the times, the issue comes from the user skipping an update, placing mods in different LO than the Collection that is following, not reading the mod’s author page or the tutorial the guides create for them.
Is better to spend time learning than try to go fast to install mods and later having issues that otherwise would have been solved being more careful and reading as much as possible not only the mod authors instructions and comments by other users.
We are here to help you by the best of our abilities, but first help yourself as much as you can.
Finally, do not forget that modding is by definition, a risky but rewarding experience. Getting frustrated is easy: breath, take a pause, and comeback later with a better mindset.
